Thursday, September 29, 2011

Vegan Chocolate Cake

Sorry I am a day behind! Reporting on day 3 of vegan week. On Tuesday, I ate:
  • shredded wheat with soy milk
  • Pepita-cranberry snack mix
  • sesame bar
  • banana
  • Southwest quinoa salad**
  • almond milk yogurt
  • enchilada casserole**
  • vegan chocolate cake
  • to drink: coffee, tea, water, seltzer, tea & soy milk
  • spearmints 
**recipes upcoming on blog!
So in prepping (very little for vegan week), I wanted to avoid this predicted downfall: a craving for either a cookie or cake or other pastry delight and either caving, or wasting time, money and resources driving to the co-op for a (fantastic) vegan cookie.

                                      Per usual, I just could NOT get a good shot of this

I chose a recipe for vegan chocolate cake from Moosewood Restaurant New Classics. I'd always been intrigued by the recipe, this was a good springboard to try it. Once I sampled the cake, what impressed me most was not that it's vegan, but that it pulled together as fast as a box mix cake.

Deep Chocolate Vegan Cake (serves 8, from Moosewood Restaurant New Classics)
  • 1 1/2 C AP flour
  • 1 C sugar
  • 1/3 C unsweetened cocoa powder
  • 1/2 tsp baking soda
  • 1/2 tsp salt
  • 1/2 C vegetable oil
  • 1 C cold water or chilled coffee
  • 2 tsp vanilla extract
  • 2 Tbsp cider vinegar
1. Preheat oven to 375. Oil a 8 x 8 baking pan and dust the bottom with some extra cocoa powder. In a medium bowl, sift together the flour, sugar, cocoa, baking soda, and salt.
2. In a second bowl, mix the oil, water or coffee and vanilla. Do not add the vinegar yet. Pour the wet ingredients into the bowl of dry ingredients and mix until blended.
3. Add the vinegar and briefly stir. Immediately, the vinegar and baking soda will react. Pour the batter into the baking pan.
4. Bake for 25-30 mins or until a toothpick comes out clean. 


Kitchen Notes: The picture makes the cake appear crumbly, this was the 1st piece out of the pan, and wasn't dry. I used Dean & Deluca cocoa powder, and this cake will only be as good as the cocoa used. I didn't do the research on it, but I imagine the vinegar/baking soda reaction allows the cake to rise and creates the texture.


Verdict? While certainly not the most decadent cake I've ever had, the chocolate flavor is impressive and I didn't miss the eggs. For a very quick cake, this is super tasty. The texture is not super moist, but not too dry. It's some of the most awesome batter I've ever had, and no worries about salmonella--I encourage licking the bowl!

    Tuesday, September 27, 2011

    Vegan Fried Green Tomatoes with Creamy Tomatillo Salsa

    ...with bonus fried pickles! Monday marked day 2 of vegan week. Here's a reminder. Monday, I ate the following:
    • almond milk yogurt
    • to drink: coffee, seltzer, coke, & water
    • vegan chocolate cake**
    • vegetable pizza*
    • pepita-cranberry snack mix
    • campanelle with garlicky broccoli**
    *exempt leftover item that would spoil during vegan week if not eaten
    **recipe to follow

    This recipe was especially challenging for me. My husband and I had purchased some green tomatoes at the coop before vegan week with the intention of frying them. This was challenging because I had never made fried green tomatoes, and I wasn't sure how to compensate for the egg bath or buttermilk bath I had seen in most fried green tomato recipes.


    I used the Dinosaur Bar-B-Que An American Roadhouse for guidance on prepping the tomatoes, but the recipe is my own. I searched online for a vegan buttermilk substitute, and the general consensus is 1 C soy milk with 1 Tbsp lemon juice or vinegar, allowed to sit for 10 mins. The tomatillo recipe comes from Kevin at Closet Cooking, however the adaption into a creamy version is my own. Here we go!

    Creamy Tomatillo Sauce (makes about 1 1/2 C--try to make in advance)
    • 3/4 lb tomatillos, husked
    • 2 jalapenos, stemmed and sliced in half longways
    • 1/2 med-large onion, cut into 8 wedges
    • 2 cloves garlic
    • juice & zest of 1 lime
    •  1/2 C cilantro
    • salt to taste
    • pepper to taste
    • 4 oz soy cream cheese
    1. Put the broiler on high. Arrange the tomatillos, jalapenos (skin side up), and onion in a single layer on a baking sheet. 
    2. Broil until the jalapenos are darkened, and the tomatillos blackened all over. The tomatillos release a lot of juices, be careful when removing from oven. 
    3. In a food processor, place the tomatillos, jalapenos, onions, garlic, lime juice and zest, and cilantro and mix until it's reached the desired consistency. Add a bit of salt and pepper and adjust as needed.
    4. Remove half of the tomatillo sauce and save for another recipe. Add the soy cream cheese and pulse til smooth. Refrigerate the sauce until ready to use.

    Kitchen Notes: Kevin's original recipe called for 1lb tomatillos. I only had 3/4lb, so I reflected that here. I was concerned that the flavor of the sauce would be very charred tasting, but it isn't. I needed to remove the jalapenos before the tomatillos. I use Tofutti brand Better Than Cream Cheese.

                                                                      Waiting for the oven

                                                                 Before Cream Cheese...

                                                                 And After!

    Vegan Fried Green Tomatoes (serves 3)
    •  3 green tomatoes
    • 3/4 C soy buttermilk (see instructions above)
    • 1/2 C cornmeal
    • 1 tsp Old Bay seasoning (or more, or less to taste), plus extra
    • 1 tsp chili powder (or more, or less to taste)
    • pepper to taste
    • peanut oil 
    1. Slice the tomatoes into 1/2 in slices. Blot on paper towels to drain and dry out the tomatoes a bit.
    2. Begin heating the peanut oil to 350 degrees. You'll need at least 1/2 inch of oil for a 9 inch heavy skillet. Sprinkle a bit of Old Bay seasoning on each slice of tomato, each side. 
    3. Mix together the corn meal, Old Bay, chili, and pepper in a large bowl. 
    4.. Set up a work station: buttermilk, bread, fry, drain, warm. Dip a slice of tomato in buttermilk, shaking off excess. Next, heavily coat the tomato slice in the corn meal mixture. 
    5. Fry the tomato 2-3 mins on each side. Several tomatoes can be cooked at once, but don't crowd the pan. 
    6. Drain the tomatoes on a paper towel, and keep warm in low oven. 
    7. Continue frying tomatoes, but ensure that oil returns to 350 before adding more. Enjoy, enjoy, enjoy! 


    Kitchen Notes: The Dinosaur Bar B Que cookbook recommends breading the tomatoes then allowing them to sit in the fridge for 30 minutes.

    Verdict? Kevin's tomatillo sauce recipe was spot-on, I'll try to never buy commercial salsa verde again. The addition of the soy cream cheese made for an outstanding dip, but without the heaviness of cream based dips. The breading was delightful, but the tomatoes were not very crispy, but they were not soggy either. I'm exciting to make these again.

    Monday, September 26, 2011

    Pepita-Cranberry Snack Mix

    Reporting in from day 1 of vegan week. For a quick primer on vegan week, see previous blog entry Sunday I ate/drank the following:
    • tempeh sausage with grapes
    • coffee, tea, seltzer, water, coke, pumpkin beer
    • paneer-rice casserole*
    • vegan chocolate cake** with soy milk to drink
    • pepita-cranberry mix
    • chili-lime pistachios**
    • fried green tomatoes** with creamy tomatillo sauce**
    • And I sampled the following whilst cooking: tomatillo sauce, onion-pepper relish
    *exempt item (leftovers) due to the fact that it will have spoiled by the time vegan week is over
    **blog item to follow

    For vegan week, I am relying heavily on my trusted friends, Moosewood New Classics, Sundays at Moosewood Restaurant and Moosewood Restaurant Cooking for Health. This particular recipe comes from Moosewood Restaurant Cooking for Health with a few adaptations from me.


    Pepita-Cranberry Snack Mix (makes about 2 C)
    • 1 1/2 C raw pepitas
    • 1 Tbsp soy sauce
    • 1 tsp canola oil
    • 1/2 tsp dried thyme
    • 1/4 tsp chili powder
    • 3/4 C dried cranberries
    1. Preheat the oven to 375 degrees. Place pepitas on a baking sheet in a single layer. Toast for about 7 min, or until they begin to darken. 
    2. While the pepitas are toasting, whisk together the soy sauce, oil, thyme, and chili powder.
    3. Remove the seeds from the oven, leaving the oven on. While on the baking sheet, drizzle the soy sauce mixture over the seeds and stir until coated. 
    4. Place back in the oven and cook for 2-3 mins, watching constantly. Don't let these guys burn!
    5. Remove from the oven and allow to cool. Once cool, add the cranberries and mix.

    Kitchen Notes: I was concerned that the amount of soy sauce in this recipe would be overwhelming, but it's not--it's fairly subtle. The original recipe called for chopping the cranberries, and I see the appeal, but I just didn't have the motivation to chop 'em up. This recipe offers a lot of flexibility, so have fun with the seasoning.

    Verdict? Addictive. Flavors subtle, but toasty, adequately seasoned, and yummy. Because I think there's a lot of opportunity for variation here, I doubt I'll make it exactly the same when I make it again. I'd look forward to any variations you recommend!

    Sunday, September 25, 2011

    Vegan Tempeh Sausage

    It's a long backstory, but my husband and I are going vegan for a week. In full disclosure, we have some concessions. Anything perishable in the fridge that would spoil as a result of our neglecting it for a week, is exempt, including both leftovers and some whole ingredients. So, there will be some consumption of turkey (him), leftover poblano stuffed peppers (me), and a paneer-rice casserole (us). Also, without getting into a lengthy explanation, we are not omitting honey or white sugar.

    Provided we can commit to this for a week, here is a skeleton of a planned menu with some possible meal/snack options for the week that may or may not appear as blog posts:
    • vegan tempeh sausage
    • pepita/cranberry snack mix
    • chili-lime pistachios
    • Indian bi bim bop
    • broccoli bow ties
    • fried green tomatoes
    • cashew cream
    • Spanish bean soup
    • carmelized onion & spinach hummus
    • almond oatmeal
    • enchilada casserole
    • lentil bolognese
    • japchae
    • bean burritos
    • polenta with maple/cranberry topping
    I promise you, we will not get to all of these, and some may be disasters. But that's the fun of the kitchen.


    Anyway, this morning I made vegan tempeh breakfast patties. Be forewarned: If you expect this to taste like genuine sausage, you will be sorely disappointed. Additionally, though the recipe says they are patties, they are more suitable for crumbles. If you're looking for a low-fat alternative to sausage, you will also be disappointed as tempeh is not low-fat and the recipe uses a lot of oil. On a happy note, the fat is healthy fat, tempeh is packed with protein (20g a serving) they are quite yummy, and smell like Thanksgiving!

    Recipe taken from my standby, Moosewood New Classics. Wording changed.

    Vegan Tempeh Sausage (serves 4 hungry people)
    •  16 oz tempeh (2 packages)
    • 3 Tbsp canola oil
    • 1 tsp dried sage
    • 1 tsp dried thyme
    • 1 tsp salt
    • 1/4 tsp ground black pepper
    • 1 Tbsp soy sauce
    • 3 Tbsp AP flour
    1. Preheat the oven to 400 degrees. Heavily oil a large cookie sheet.
    2. Crumble the tempeh and place in a steamer basket. Steam for 10 minutes or until soft. While the tempeh is steaming, whisk together the remaining ingredients in a small bowl. Use 2 Tbsp of the oil, reserve the remaining Tbsp.
    3. When cool enough to handle, place the tempeh in a large bowl and add the small bowl of mixed ingredients. With clean hands, combine til well incorporated. Add additional oil or flour if necessary. Mixture will be crumbly.
    4. Roll into balls (1 in or larger), place on cookie sheet and flatten to 1/3 in or so. Brush with the remaining oil.
    5. Cook for 5 mins until tops are brown, flip, and cook for an additional 5 mins.


    Kitchen Notes: Unfortunately, these do not form into patties well, they are super crumbly, fall apart easily, but are by no means dry. The original recipe calls for only 2 Tbsp flour, but it was impossible to bind the ingredients. The additional Tbsp does not impart a floury taste nor does it dry out the patties. I saved half of the mixture and reserved it for another recipe when I realized it was so crumbly. My phone settings make the patties appear yellow, they were actually a nutty brown color when done.

    Verdict: If you require a perfect presentation, avoid this recipe. If you don't mind a patty that falls apart when you eat it, you may enjoy this. It's far more nutritious than commercial veggie sausages, and is exceptionally tasty in my opinion. As mentioned above, they're crumbly, but not dry at all. It would be a great filler for an omelet (negating the vegan factor, I know!) or for a veggie sausage gravy. The ends are perfectly crispy, the middle juicy, chewy and satisfying. A keeper.
     

    Sunday, September 18, 2011

    Quinoa Tabbouleh: Now with Video!

    If you'd like a traditional tabbouleh, please search elsewhere. I love tabbouleh, it's easy, it's one of my favorite summer salads, it's filling and refreshing. Sometimes, though, I stray from the typical tabbouleh. This one features quinoa rather than the typical bulgar wheat. I made this with leftover quinoa.
    Please excuse the messy picture!

    Quinoa Tabbouleh (makes about 3 C)
    • 2C quinoa, cooked
    • 3 large handfuls parsley, finely chopped (about 1 small bunch)
    • 1/2 med cucumber, diced
    • 2 small tomatoes, diced
    • 1/4 red onion, diced
    • juice of 3 lemons (about 6 Tbsp)
    • zest of 1 lemon
    • 2 Tbsp olive oil
    • 1 garlic clove, finely diced
    • salt to taste
    • pepper to taste
    1. In a small bowl, whisk together the lemon juice, zest, olive oil, garlic, salt and pepper. Set aside.
    2.Combine the quinoa, parsley, cucumber, tomato, and onion in a large bowl. Mix together.
    3.Combine the quinoa mixture and the lemon juice mixture together. Allow to sit for a few hours for the flavors to develop. 


    Kitchen Notes: Tabbouleh is traditionally a parsley salad with a higher ratio of parsley than grain, the grain is to absorb the juices. Folks who like a more grain based tabbouleh will need to adjust the ratio. This seems like a lot of lemon, but trust me, it works.

    Verdict? I'm still salivating over my quinoa salad with lemon vinaigrette, so comparatively speaking, it was a bit bland. It was refreshing and palate cleansing, and a good meal for a hot day, but I prefer the other quinoa salad.

    Update: My friend Katie sent me this hysterical link, the tabbouleh song, from the comic Remy Munasifi. If you didn't  think tabbouleh needed an anthem before, this video may make you change your mind:
     

    Saturday, September 17, 2011

    Ingredient Elimination & A Trio of: Savory Pecans

    To close out my trio of roasted nuts, I break both my pattern of baking with almonds seasoned like hot beverages (see my previous posts for Chai Almonds and Hot Cocoa Almonds) and switch to pecans with a savory slant. In addition, I used my last egg white. Hurrah!

                                                            Packed up for a dinner party!

    This recipe is modified from Moosewood Restaurant New Classics. I tried the original recipe and was greeted with failure, the nuts burned, and had little flavor. With modifications it's a great bar snack. Enjoy!

    Savory Pecans (makes 2 C)
    • 2 C raw pecans
    • 1 egg white
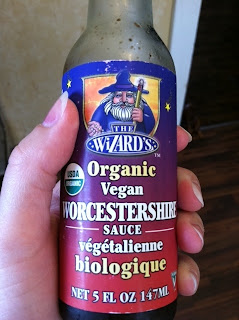
    • 2 Tbsp Worcestershire sauce (I use a vegetarian version--see kitchen note below)
    • 2-3 tsp Old Bay seasoning
    • 1/2 tsp garlic powder
    • 1/2 tsp chili powder
    1. Preheat the oven to 350 degrees. Mix together the Worcestershire sauce, Old Bay seasoning, garlic powder, and chili powder until it forms a paste.
    2. In a separate bowl, lightly froth the egg white with a fork. Mix together with the Worcestershire sauce paste until combined.
    3. Pour the mixture over the pecans and stir until the nuts are well coated.
    4. Place the nuts on a lightly greased baking sheet in a single layer. Bake for 10 minutes, stir. Bake for another 5-10 minutes. Do not allow the coating to burn.

    Kitchen Notes: The original recipe calls for mixed nuts, but from experience the pecans especially shine in this recipe, so I prefer to use them exclusively. The original recipe also calls for a greater amount of Worcestershire sauce and a lesser amount of Old Bay. The veggie Worcestershire sauce I use is Wizard's brand, and I've always been happy with it. I've included a photo below.


    Verdict? I love the flavor of Old Bay, so I'm partial to these. As you can gather from the ingredient list, these are very salty but have a great flavor, and probably are no worse for you then commercially available salted nuts. Give them a try, and add seasonings that you adore.


    Tuesday, September 13, 2011

    Ingredient Elimination & A Trio of: Chai Almonds

    Here's my second installment in my trio of roasted nuts and my second attempt at getting rid of egg whites. I wanted to make a sugared almond with a little something extra. For this, I took a basic sugared almond recipe and added the seasoning from a Chai tea recipe from Sundays at Moosewood Restaurant. I was pleased with the result. Just a reminder, the first installment was hot cocoa almonds.
                                                     They smelled as awesome as you'd imagine!

    Chai Almonds (Makes 2 C)
    • 2 C raw almonds
    • 1 egg white
    • 1/2 C sugar
    • 1/2 tsp ground cinnamon
    • 1/2 tsp ground ginger
    • 10 ground cardamom pods
    • 1/2 tsp ground black pepper
    • 1/4 tsp ground cloves
    • 1/2 tsp ground coriander seeds
    • pinch salt
    1. Preheat the oven to 350. Combine the sugar with all the spices in a small bowl.
    2. Lightly froth the egg white. Pour over the almonds and combine until well mixed.
    3. Add the sugar mix to the almonds, combine until well-coated.
    4. On a lightly greased cookie sheet, spread the almonds into a single layer.
    5. Pop in the oven for 10 minutes, then stir. Pop in the oven for another 10 minutes, insuring it doesn't burn. Let cool before serving.
     Verdict? Very yummy twist on sugared almonds. I found that the spices were a bit more subtle than I'd like, so next time I'll bump up the ratio a bit. They are a bit addictive, so watch out!

    Sunday, September 11, 2011

    Ingredient Elimination & A Trio of: Hot Cocoa Almonds

    I've been making sugared almonds for a long time. I can't remember where I initially found a recipe, nor do I ever make them exactly the same way each time, but they are a go-to for me when I need to use up some egg whites.

    So,  since I had 3 egg whites from my Grown-Up Dirt Pudding, I decided to make a trio of roasted nuts, starting with Hot Cocoa Almonds, followed by Chai Spiced Almonds, and ending with Savory Pecans. I realized shortly after I planned out these recipes that the 1st two relate to hot beverages, and was disappointed with myself that I didn't transform the pecans into something coffee related, or given the emerging season, hot cider related. Oh well, next time.

    Hot Cocoa Almonds (makes 2 C)
    • 2 C raw almonds
    • 1 egg white, lightly beaten
    • 1 tsp vanilla extract
    • 1/2 C sugar
    • 1 Tbsp pure cocoa powder
    • 1 tsp cinnamon
    • pinch salt
    1. Preheat the oven to 350 F. Place the almonds in a medium mixing bowl. 
    2. In a small bowl, whisk together the egg white and the vanilla extract.
    3. In a separate bowl, mix together the sugar, cocoa powder, cinnamon, and salt.
    4. Pour the egg mixture over the almonds and mix until well coated.
    5. Add the sugar mixture to the almonds and mix until well coated.
    6. Lightly spray a baking sheet with oil. Spread the almonds into a single layer on the baking pan.
    7. Bake for 10 minutes. Stir, and bake for up to another 5 minutes, watching closely for the last few minutes--these burn easily.
                                          Almonds, sugar mix, and egg whites, ready to go

    Kitchen Note: This recipe will only be as good as the cocoa used. I used Dean & Deluca, with good result.


    Verdict? I was disappointed with the first bite, but the finish has a strong cocoa flavor that builds as you eat more and more almonds. I was very hesitant to use much cocoa for fear it would burn, but next time I will increase to 1.5 Tbsp. I'm definitely making this again, I'd like to make a spicy version with cayenne, as well as a version with toasted coconut. Yum.
     

    Saturday, September 10, 2011

    Chinese Broccoli & King Mushrooms in Oysterless Sauce

    Last winter a friend and I went to a cooking class by Tien Douglas through Urbana Adult Education. In the class, Tien introduced me to several vegetarian products sold at Far East Grocery, including a vegetarian version of oyster sauce, from Oriental Mascot foods. This website sells it if you're inclined to buy. The class also introduced me to the king mushroom that when sliced thin, has a texture similar to abalone.

    Chinese Broccoli & King Mushroom in Oysterless Sauce (serves about 4)
    • 2 king mushrooms, sliced thin, caps removed
    • 1 bunch Chinese broccoli, chopped, stems and leaves separated
    •  Cooking oil
    •  1/2 C oysterless sauce
    • splash of sesame oil
    •  3 cloves garlic, minced
    1. Heat the oil in the wok over medium high heat. Add the mushrooms, stirring frequently. Cook until the mushrooms are slightly browned.
    2. Add the Chinese broccoli stems, oysterless sauce, and splash sesame oil. Cook for a few minutes, add a bit of water to soften the stems if needed.
    3. When stems are nearly cooked through, add the leaves of the Chinese broccoli and the garlic. Stir frequently, adding more sauce if necessary.
    4. Serve over rice or noodles if desired.
                                                           King Mushroom, Whole

                                                               King Mushroom, Sliced

      Veggie Oyster Sauce...What would a veggie oyster pearl be like? A lentil? Some other legume?

    Kitchen Notes: Thin sliced king mushrooms cook quickly and they don't reduce as quickly as shiitakes, portabella, or other common mushrooms. Add the garlic earlier if desired--I like mine fairly raw tasting in this dish.

    Verdict? A very tasty quick, easy meal. The veggie oyster sauce has a nice smoky aroma and flavor with a lot of earthiness to it. The king mushrooms have a satisfying texture and the Chinese broccoli a lot of pleasant, mustardy/bitter flavor. I made the mistake of serving over quinoa the first time, since I already had some made, and it was too bitter with the bitter broccoli. Plain rice would be great, and served over noodles was yummy. Enjoy!
                                                                    Over noodles

    Monday, September 5, 2011

    Ingredient Elimination: Grown-Up Dirt Pudding

    Today's featured ingredient in ingredient elimination is sandwich cookies. Specifically, Newman's Own Hint-O-Mint. Please, commence I rolling that I let Oreos, Hydrox, or Newman's Own cookies go stale. I was so tempted by the cookies on sale at my co-op, but can't eat a whole bag. Since they hadn't gone bad, just stale, so throwing them out seemed wrong. Grown-Up Dirt Pudding to the rescue.

    Why "Grown-Up" dirt pudding? For starters, it's got booze in it, so keep the kiddos away. Next, we have that it follows the somewhat obnoxious trend of gentrifying highly processed kids desserts (e.g., homemade organic Twinkies anyone?). This uses homemade pudding in place of the packaged stuff, and real whipped cream instead of Cool-Whip.

    The basic pudding recipe comes from Tyler Florence from the Food Network page. The other additions are my own.


    Grown-Up Dirt Pudding (serves about 6)
    • 2 C whole milk (I used 2%)
    • 1/2 C sugar
    • 1/3 C pure cocoa powder
    • 4 tsp cornstarch
    • 3 egg yolks
    • 2 tsp vanilla extract
    • 1/4 tsp fine salt
    • about 12 mint sandwich cookies, crushed
    • 1 C whipping cream 
    • 1 Tbsp confectioner's sugar
    • splash peppermint schnapps
    • pinch salt
    1. Mix 1-and-a-half C milk, sugar, and cocoa powder in a sauce pan. Bring to a simmer over medium heat, then remove from heat.
    2. Whisk the remaining 1/2 C milk, cornstarch, salt, egg yolks, and vanilla in a bowl. Gradually incorporate the hot milk mixture into the egg mixture.
    3. Place the combined ingredients into the saucepan, cook over medium-high heat whisking constantly, bringing to a full boil. Continue whisking, reduce heat, maintain at a simmer. Whisk 3 more minutes until thickened.
    4. Remove from heat, pour into a bowl. Cool in fridge for at least 6 hours.
    5. Once the pudding has fully cooled, mix the crushed cookies into the pudding.
    6. In a separate bowl, combine the whipping cream, peppermint schnapps, confectioner's sugar, and salt. Whip until fluffy. Fold into the pudding mix. 

    Kitchen Notes: I used Dean and Deluca cocoa. This was probably a bit too rich for this recipe. However, pure, unsweetened cocoa, is needed, otherwise the cocoa will be too sweet and lacking in chocolate flavor. I whip my chocolate by hand, since I feel I earn it that way :) Add more, or fewer cookies to this as desired. This can be presented in layers, rather than mixed together for a more attractive effect. I threw it together while running out the door for a picnic, so presentation was not a priority.

    Verdict? Pretty tasty. Chocolate and mint are among my favorite combinations, so I had fun with this. I liked this recipe, since I had never tried to make chocolate pudding before. It's very easy, and compare the list of ingredients in this pudding versus a box of conventional pudding. There's no comparison:

    Sunday, September 4, 2011

    Harissa Hummus

    The weather cooperated long enough today that I was able to go on a picnic with a couple of friends. Yesterday, the temperature reached 100 degrees. While picnicking it was 72. I'm embarrassed to say I was cold.

    I had to work a bit today, so I didn't have times to make anything elaborate for the picnic (nor should picnic food BE elaborate, but I digress). I pulled together some hummus featuring the harissa I made yesterday.

                                                    Packed up and ready to go on a picnic

    Harissa Hummus (makes about 2 cups)
    • 1 can chick peas, drained (~15 oz )
    • 1 heaping Tbsp tahini
    • juice of 1 lemon
    • zest of 1/2 lemon
    • 1 Tbsp olive oil
    • 1 tsp toasted cumin seeds, ground
    • 1/4 tsp paprika
    • salt to taste
    • 2 tsp harissa (or more, or less)
    1. Combine all ingredients except for the harissa in a food processor, pulse til smooth.
    2. Taste, add additional seasonings if needed, add harissa. Blend again. Taste, adjust again as needed.


    Kitchen Notes: Don't try making this hummus without the harissa. It's too bland by itself, but well seasoned with it. For me, this hummus was initially very hot. When I served it later, it had mellowed significantly. If not serving immediately, taste again to ensure additional harissa is not needed.


    Verdict? A yummy, spicy hummus. For this however, I wish I had a milder version of the harissa. This hummus is very good, but it more or less tastes like spicy hummus, it doesn't have a lot of the harissa flavor. A milder harissa would really transform the hummus into something a bit more unique.

    Saturday, September 3, 2011

    Ancho-Tabasco Harissa

    So, I like spicy foods. And salty foods. And foods with cumin. Inexplicably, the delicious North African condiment called harissa had alluded me until I tried it at the Schlafly Taproom in St. Louis. Their harissa, likely laced with mayo, took the spotlight from the sandwich it came with. This stuff was so good, I actually abandoned the malt vinegar I usually douse my fries with for it.
    I can't find a consensus about what kind of dried chilis to use. I used what was available to me, and what I felt would compliment each other well--tabascos and anchos. The recipe that mine is based from, by Saveur, used guajillo chilis and New Mexico chilis.

    Harissa (makes about 1 C)
    • 0.5 oz dried tabasco chilis, stemmed (seeds removed if you want less heat)
    • 1 oz dried ancho chilis, stemmed (seeds removed if you want less heat)
    • 1 tsp whole cumin seeds
    • 1/2 tsp whole caraway seed
    • 1/2 tsp whole coriander seed
    • 3 Tbs olive oil, plus extra if needed
    • juice of 1 lemon
    • 5 cloves garlic
    • salt to taste
    1. Place the chilis in a medium bowl. Pour boiling water over them, cover. Let stand 20 mins. or til soft.
    2. Place the cumin, caraway, and coriander in a small skillet over medium heat. Shake the skillet often. Heat til fragrant. Grind the spices.
    3. Drain the peppers and place in a food processor. Add the spices, garlic, lemon juice, olive oil, and salt to taste.
    4. Puree until smooth. Add additional olive oil and salt if needed. Use sparingly as a substitute for many hot sauces. 
                                                          Love the smell of toasted spices!

    Kitchen Notes: You have a lot of flexibility in the peppers you choose, go go based on what you like, and how much heat you prefer. This version is very spicy as I didn't remove the seeds. The original version called for half as much cumin, but I enjoy the flavor tremendously.

    Verdict? I was questioning my choice of the tabasco and ancho chilis, but they complement each other well. The ancho has a mildly smoky flavor, the tabasco a sort of woodsy flavor. The garlic is very assertive. For someone who is not a raw garlic fan, roasted garlic would probably be good, though the flavor entirely different. I plan to incorporate into some hummus, and I'll report in.